Advancing a guidewire in the side branch (SB) before main vessel (MV) stenting in coronary bifurcation lesions (CBLs) can effectively prevent SB occlusion, which is associated with procedural myocardial infarction and adverse cardiac events12. However, antegrade wiring of the SB is challenging in some complex CBLs with extremely angulated SB branching. The reverse wire technique (RWT), in which the distal guidewire is bent into a swan-neck shape, is employed in these complex CBLs2345. Although the efficacy of the RWT for SB patency has been reported in series of case reports345, it is not universally effective for all complex CBLs, and the factors that determine RWT failure have not been elucidated. We investigated the risk factors for RWT failure.
In the balloon blocking technique (BBT), an optimal-sized balloon is inflated in the distal MV to block guidewire advancement to the MV and promote entry into the SB; this approach is also adopted in cases of challenging antegrade wiring due to complex bifurcation anatomy. This technique was initially used in endovascular interventions6 and has recently been used in percutaneous coronary interventions (PCIs)78. We also investigated the feasibility and efficacy of the BBT as an alternative method in cases of RWT failure or challenging RWT.
Methods
Study population and design
We analysed 32 consecutive cases of drug-eluting stent implantation in complex CBLs with difficult SB wiring performed at the National Hospital Organization Kyushu Medical Center (Fukuoka, Japan) from January 2015 to May 2024. Successful SB wiring with the RWT was observed in 17 of 25 cases (Figure 1A, Moving image 1). The BBT was attempted in 8 cases of RWT failure, resulting in successful SB wiring in 5 cases (Figure 1B, Moving image 2, Figure 1C, Moving image 3). The BBT was selected upfront in 7 cases as the delivery of the bent guidewire in the RWT was strongly predicted to be difficult because of severe tortuosity, calcification or dissection in the distal MV; all 7 cases ultimately resulted in successful SB wiring. The included cases were divided into two groups: one in which RWT was successful (RWT-S, n=17) and another in which RWT failed or primary BBT was used (RWT-F/BBT, n=15). Patient characteristics, PCI procedural details, and lesion characteristics were compared between the two groups.
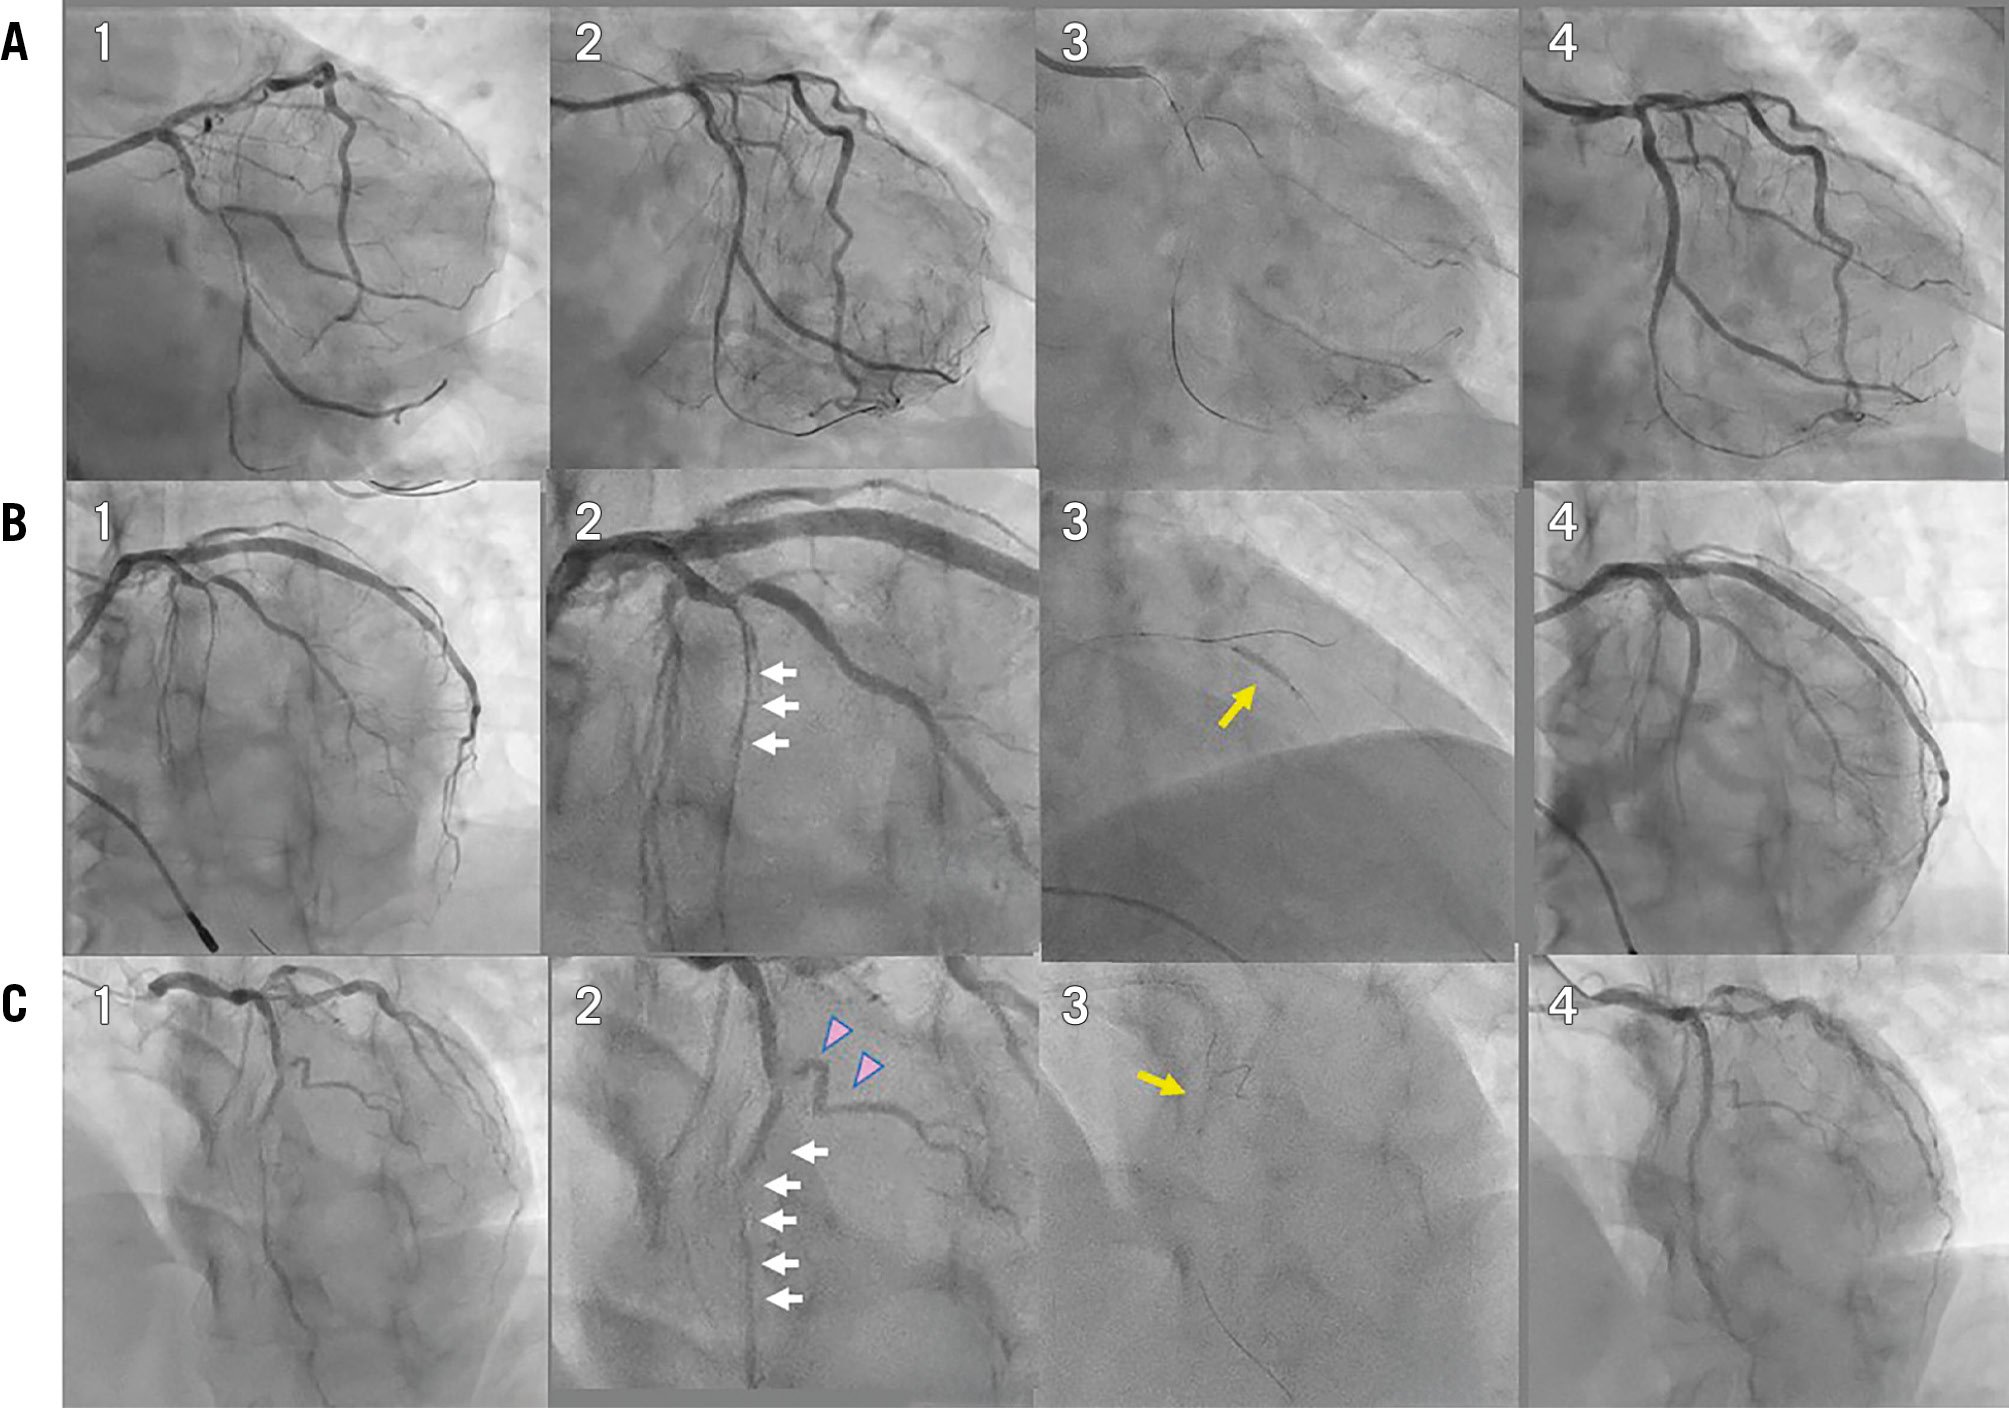
Figure 1. Representative cases of side branch wiring with the RWT and BBT after RWT failure. A) Case 1: RWT success; A1) pre-PCI; A2) immediately after orbital atherectomy in the MV in the left circumflex artery; A3) SB wiring with RWT; A4) final angiography after drug-eluting stent deployment in the MV and drug-coated balloon inflation in the SB (Moving image 1). B) Case 2: RWT failure and subsequent SB wiring with the BBT; B1) angiography prior to the SB wiring showed diffuse vessel dissection after predilation in the distal MV; B2) magnified view. Vessel dissection, indicated by white arrows, inhibited the advancement of the bent portion of the reverse wire; B3) SB wiring with the BBT. An appropriately sized balloon for the distal MV was inflated, indicated by the yellow arrow, to prevent guidewire advancement to the distal MV and to promote SB wiring; B4) final angiography after drug-eluting stent deployment in the MV and plain balloon dilation in the SB (Moving image 2). C) Case 3: RWT failure and subsequent SB wiring with BBT; C1) angiography prior to SB wiring showed diffuse in-stent restenosis in the distal MV; C2) magnified view. A diffuse in-stent restenotic lesion (white arrows) inhibited the advancement of the bent portion of the wire. Additionally, a severe bend in the SB (pink triangles) made SB wiring more challenging; C3) SB wiring with BBT. An appropriately sized balloon for the distal MV was inflated, indicated by the yellow arrow, to promote SB wiring without guidewire prolapse into the distal MV; C4) final angiography after drug-coated balloon inflation in the MV and plain balloon dilation in the SB (Moving image 3). BBT: balloon blocking technique; MV: main vessel; PCI: percutaneous coronary intervention; RWT: reverse wire technique; SB: side branch
Percutaneous coronary intervention
All patients were treated with sufficient periprocedural heparin and dual antiplatelet therapy with aspirin and either clopidogrel or prasugrel, which was continued for at least 1 month according to the Japanese Circulation Society guidelines9. All PCIs were guided by intracoronary imaging (intravascular ultrasound [IVUS] or optical coherence tomography [OCT]). In the RWT, the bent shape, curve, and length of the compatible guidewires (SION black and FIELDER FC [both Asahi Intecc] and Amati [Japan Lifeline]) were determined according to the anatomy of the target CBL. Predilation of the MV was allowed in cases of an uncrossed bent wire, and a double-lumen catheter (Crusade [Kaneka] or SASUKE [Asahi Intecc]) was used concomitantly to advance the bent guidewire to the distal end without significant friction45. In the BBT, a blocking balloon with a size determined according to intracoronary imaging was inflated at the orifice of the distal MV so that the guidewire would not slip on the surface of the balloon towards the distal MV. SB predilation and kissing balloon inflation before MV stenting, as well as the jailed balloon technique for more active protection of SB patency after MV stenting, were operator dependent. The proximal optimisation technique, using a short balloon according to the proximal MV size, was recommended; however, its use relied on the discretion of the operator after an intracoronary imaging assessment for MV stent expansion. After MV crossover stenting, SB ostial dilation and the choice of method (kissing balloon inflation or SB dilation alone) were also operator dependent.
Lesion assessment
Quantitative coronary angiography (QCA; CAAS Workstation 7.0 [Pie Medical Imaging]) was performed just prior to the RWT or BBT procedure, after MV predilation if necessary, and at the end of the procedure to investigate the minimum lumen diameter (MLD) in the proximal and distal MV and SB. The proximal (BA−α: between the proximal site of the SB and distal MV) and distal bifurcation angles (BA−β: between the middle site of the SB and distal MV) were measured on the baseline angiogram without guidewire insertion. The vessel condition just prior to the RWT or BBT was assessed visually using angiography. Coronary dissections classified as type B or higher, according to National Heart, Lung, and Blood Institute classification10, were included. Severe calcification was identified as dense opacification visible along both sides of the vessel contour without contrast injection on fluoroscopy11. Severe bending was defined as a lesion with either two bends >90° or three bends >75°12. Coronary calcium, identified as a bright, high-echoic deposit with a sharp acoustic shadow on IVUS and as distinct, low-signal areas with sharp borders on OCT, was assessed based on its location – either on the SB ipsilateral or contralateral side in the proximal or distal MV. This assessment was performed prior to any PCI treatment in cases where imaging catheter delivery was successful and after predilation or plaque modification in cases where catheter delivery initially failed.
Clinical outcome at follow-up
Coronary angiography was performed in cases of recurrent angina or myocardial ischaemia during the follow-up period. Death, target lesion revascularisation, target vessel revascularisation, and myocardial infarction up to August 2024 were investigated at an outpatient clinic.
Statistical analysis
Continuous variables are expressed as mean±standard deviation. Categorical variables are presented as percentages. Between-group comparisons of continuous variables were performed using the Student’s t-test. A predictive model for RWT failure was developed, and its discriminatory ability was evaluated using receiver operating characteristic (ROC) curves and the area under the curve (AUC). All reported p-values were determined by two-sided analyses, and p-values<0.05 were considered statistically significant. Analyses were performed using R version 4.2.2 (R Foundation for Statistical Computing).
Results
Patient background
High prevalences of hypertension (88% and 100%), dyslipidaemia (76% and 87%), and diabetes mellitus (41% and 60%) were observed in the RWT-S and RWT-F/BBT groups, respectively; however, there were no significant differences between the two groups (Table 1).
Table 1. Patient characteristics and PCI procedure details.
| RWT successn=17 | RWT failure/primary BBTn=15 | p-value | |
|---|---|---|---|
| Patient background | |||
| Age, years | 65.2±11.5 | 71.5±13.3 | 0.17 |
| Male | 15 (88) | 9 (60) | 0.11 |
| Hypertension | 15 (88) | 15 (100) | 0.49 |
| Dyslipidaemia | 13 (76) | 13 (87) | 0.66 |
| LDL cholesterol, mg/dL | 104±43 | 92±38 | 0.40 |
| Diabetes mellitus | 7 (41) | 9 (60) | 0.48 |
| HbA1C, % | 6.4±1.2 | 6.3±0.7 | 0.68 |
| Current smoker | 6 (35) | 4 (27) | 0.70 |
| Haemodialysis | 1 (6) | 0 (0) | 1.00 |
| Acute coronary syndrome | 5 (29) | 2 (13) | 0.40 |
| Prior myocardial infarction | 4 (24) | 8 (53) | 0.14 |
| Left ventricular ejection fraction, % | 56±16 | 60±15 | 0.48 |
| PCI procedure | |||
| Lesion location | 0.07 | ||
| Left anterior descending artery | 12 (71) | 6 (40) | |
| Left circumflex artery | 4 (24) | 5 (33) | |
| Right coronary artery | 1 (6) | 2 (13) | |
| Left main coronary artery | 0 | 2 (13) | |
| SB guidewire cross | 17 (100) | 12 (80) | 0.09 |
| SB occlusion | 0 (0) | 1 (7) | 1.00 |
| MV drug-eluting stent | |||
| Size, mm | 3.2±0.5 | 2.8±0.4 | 0.07 |
| Length, mm | 24.4±7.3 | 29.5±11.5 | 0.16 |
| SB drug-eluting stent | 1 (6) | 0 (0) | 1.00 |
| Drug-coated balloon | 4 (24) | 2 (13) | |
| Plain balloon angioplasty | 9 (53) | 7 (47) | |
| Jailed balloon technique | 6 (35) | 2 (13) | 0.23 |
| Kissing balloon/SB dilation | 3 (18) | 2 (13) | 1.00 |
| Imaging | |||
| IVUS | 9 (53) | 11 (73) | 0.29 |
| OCT | 8 (47) | 4 (27) | |
| Pre-PCI observation | |||
| MV | 10 (59) | 2 (13) | 0.03 |
| SB | 0 (0) | 0 (0) | 1.00 |
| Balloon blocking technique | – | ||
| Total occlusion time, sec | – | 67.5±45.0 | |
| Number of attempts | – | 1.6±0.7 | |
| Data are presented as mean±standard deviation or n (%). BBT: balloon blocking technique; IVUS: intravascular ultrasound; LDL: low-density lipoprotein; MV: main vessel; OCT: optical coherence tomography; PCI: percutaneous coronary intervention; RWT: reverse wire technique; SB: side branch | |||
PCI procedure
The target lesion was located numerically less frequently in the left anterior descending artery (40% vs 71%) and more frequently in the right or left circumflex coronary artery in the RWT-F/BBT group than in the RWT-S group (56% vs 30%; p=0.07). The final success rate of SB guidewire crossing in the RWT-F/BBT group reached 80% and did not differ significantly from the RWT-S group (p=0.09); however, SB occlusion occurred in 1 case of RWT failure. The success rate of SB guidewire crossing per technique did not differ (RWT 17/25 [68%] vs BBT 12/15 [80%]; p=0.49). The MV stent size tended to be smaller in the RWT-F/BBT group than in the RWT-S group (2.8±0.4 mm vs 3.2±0.5 mm; p=0.07). Although predilation before MV stenting was performed similarly, the jailed balloon technique for the prevention of SB occlusion was performed less frequently in the RWT-F/BBT group than in the RWT-S group (13% vs 35%; p=0.23). In the BBT, the total balloon occlusion time was 67.5±45.0 seconds per 1.6±0.7 attempts, which did not result in significant myocardial ischaemia (Table 1).
Lesion characteristics
Distal MV MLD before the procedure tended to be smaller in the RWT-F/BBT group than in the RWT-S group (1.72±0.68 mm vs 2.14±0.58 mm; p=0.07). After the procedure, there were no significant differences in the MLD of each bifurcation segment (Table 2). Regarding the vessel condition before the procedure, more calcification in the SB (33% vs 0%; p=0.01) and more bending in the distal MV (53% vs 12%; p=0.02) and SB (73% vs 24%; p=0.01) were observed in the RWT-F/BBT group (Figure 2). In a bifurcation angle analysis, both groups had a wide BA−α, with a mean value of >85°, and a narrow BA−β, which tended to be wider in the RWT-F/BBT group than in the RWT-S group (51.6±29.8° vs 36.4±18.6°; p=0.09). Although both BA−α (64.7±25.1°; p=0.0003 vs pre-PCI) and BA−β (31.6±14.7°; p=0.19) decreased after the completion of bifurcation PCI in the RTW-S group, neither BA−α (82.3±21.6°; p=0.20) nor BA−β (56.2±28.6°; p=0.33) changed significantly in the RTW-F/BBT group, with greater values than those in the RTW-S group (BA−α; p=0.06; BA−β; p=0.006) (Figure 3). Regarding the location of coronary calcification observed on intracoronary imaging, a similar distribution was noted in the proximal MV in both groups. However, significantly more calcification was detected on the SB ipsilateral side in the RWT-F/BBT group compared to the RWT-S group (62% vs 18%; p=0.02) (Table 3).
Table 2. Quantitative coronary angiography analysis of side branch wiring pre- and post-procedure.
| RWT success | RWT failure/primary BBT | p-value | |
|---|---|---|---|
| Preprocedure | |||
| Minimum lumen diameter, mm | |||
| Proximal MV | 2.08±0.68 | 2.15±0.92 | 0.83 |
| Distal MV | 2.14±0.58 | 1.72±0.68 | 0.07 |
| SB | 1.47±0.46 | 1.16±0.65 | 0.15 |
| Bifurcation angle α, ° | 91.4±20.5 | 82.0±22.3 | 0.22 |
| Bifurcation angle β, ° | 36.4±18.6 | 51.6±29.8 | 0.09 |
| Post-procedure | |||
| Minimum lumen diameter, mm | |||
| Proximal MV | 3.15±0.40 | 3.09±0.62 | 0.75 |
| Distal MV | 2.96±0.48 | 2.68±0.57 | 0.17 |
| SB | 1.68±0.46 | 1.62±0.76 | 0.79 |
| Bifurcation angle α, ° | 64.7±25.1 | 82.3±21.6 | 0.06 |
| Bifurcation angle β, ° | 31.6±14.7 | 56.2±28.6 | 0.01 |
| Values are mean±standard deviation. BBT: balloon blocking technique; MV: main vessel; RWT: reverse wire technique; SB: side branch | |||
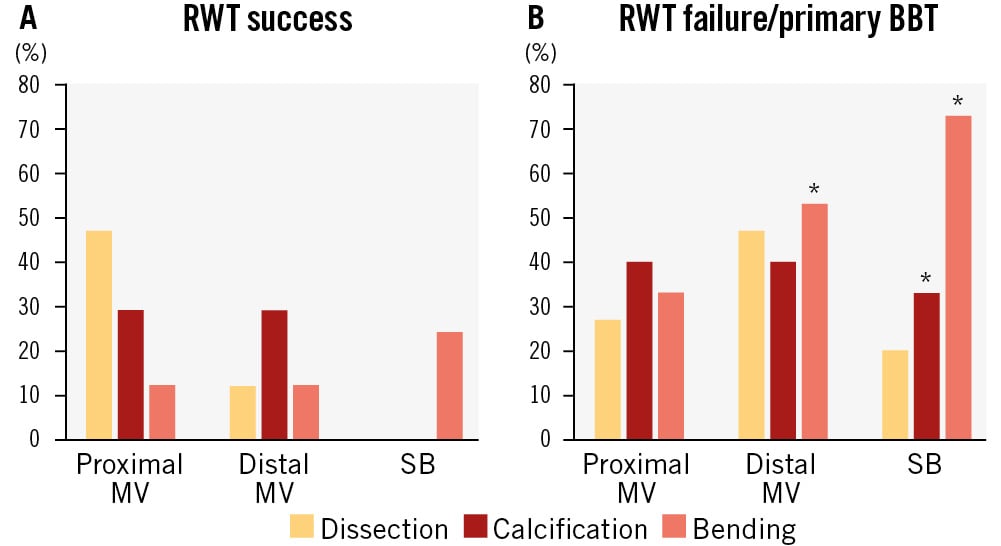
Figure 2. Vessel condition before side branch wiring. Incidences of dissection, calcification and bending were investigated in the proximal and distal main vessel (MV) and in the side branch (SB). A) Reverse wire technique (RWT) success group. B) RWT failure or primary balloon blocking technique (BBT) group. *p<0.05 vs RWT success.
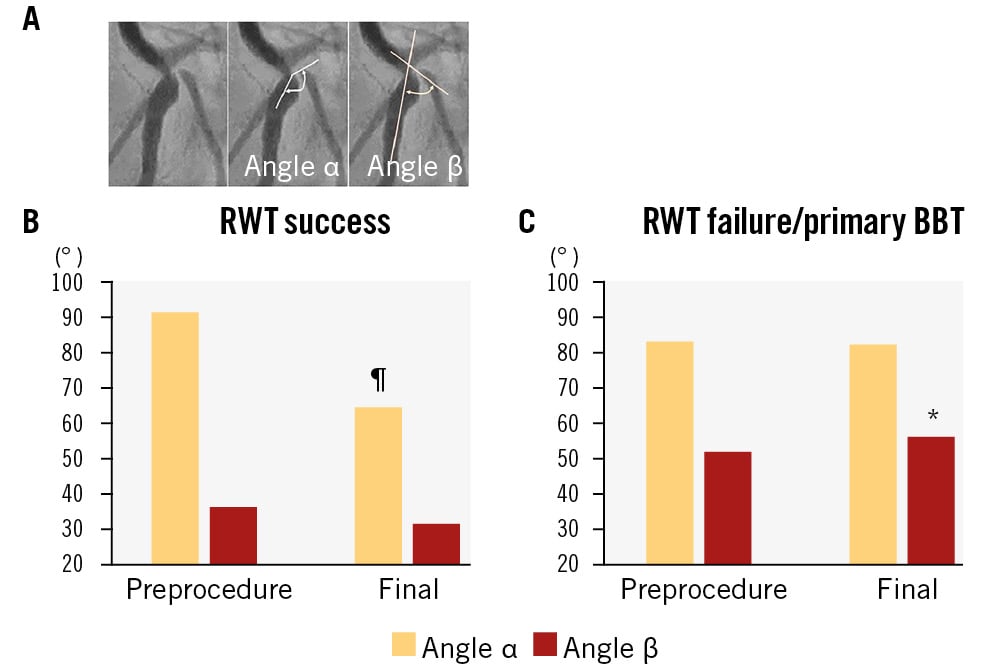
Figure 3. Analysis of bifurcation angles. A) Bifurcation angles α and β are defined as the angles between the distal main vessel (MV) and the proximal part of side branch (SB), and between the distal MV and the middle part of SB, respectively. B) Preprocedural and final bifurcation angles, α and β, in the reverse wire technique (RWT) success group. C) Preprocedural and final bifurcation angles, α and β, in the RWT failure or primary balloon blocking technique (BBT) group. *p<0.05 vs RWT success; ¶p<0.05 vs preprocedure.
Table 3. Calcium location in intracoronary imaging observation.
| RWT success | RWT failure/primary BBT | p-value | |
|---|---|---|---|
| Proximal MV | |||
| SB ipsilateral side | 10 (59) | 6 (46) | 0.71 |
| SB contralateral side | 7 (41) | 7 (54) | 0.71 |
| Distal MV | |||
| SB ipsilateral side | 3 (18) | 8 (62) | 0.02 |
| SB contralateral side | 5 (29) | 6 (46) | 0.45 |
| Values are n (%). BBT: balloon blocking technique; MV: main vessel; RWT: reverse wire technique; SB: side branch | |||
Discriminatory capacity of RWT failure
A predictive model for RWT failure was developed using ROC analysis with the AUC. Based on the observed trend (p<0.1) of reduced BA−β and greater distal MV MLD before the procedure in the RWT-S group compared to the RWT-F/BBT group, cutoff values for predicting RWT failure were identified as >34.1° (AUC 0.67, 95% confidence interval [CI]: 0.47-0.86) for BA−β and <1.77 mm (AUC 0.70, 95% CI: 0.50-0.89) for distal MV MLD. The combination of BA−β >34.1°, distal MV MLD <1.77 mm, and SB calcification showed high predictive accuracy for RWT failure (AUC 0.85, 95% CI: 0.71-0.98) (Figure 4).
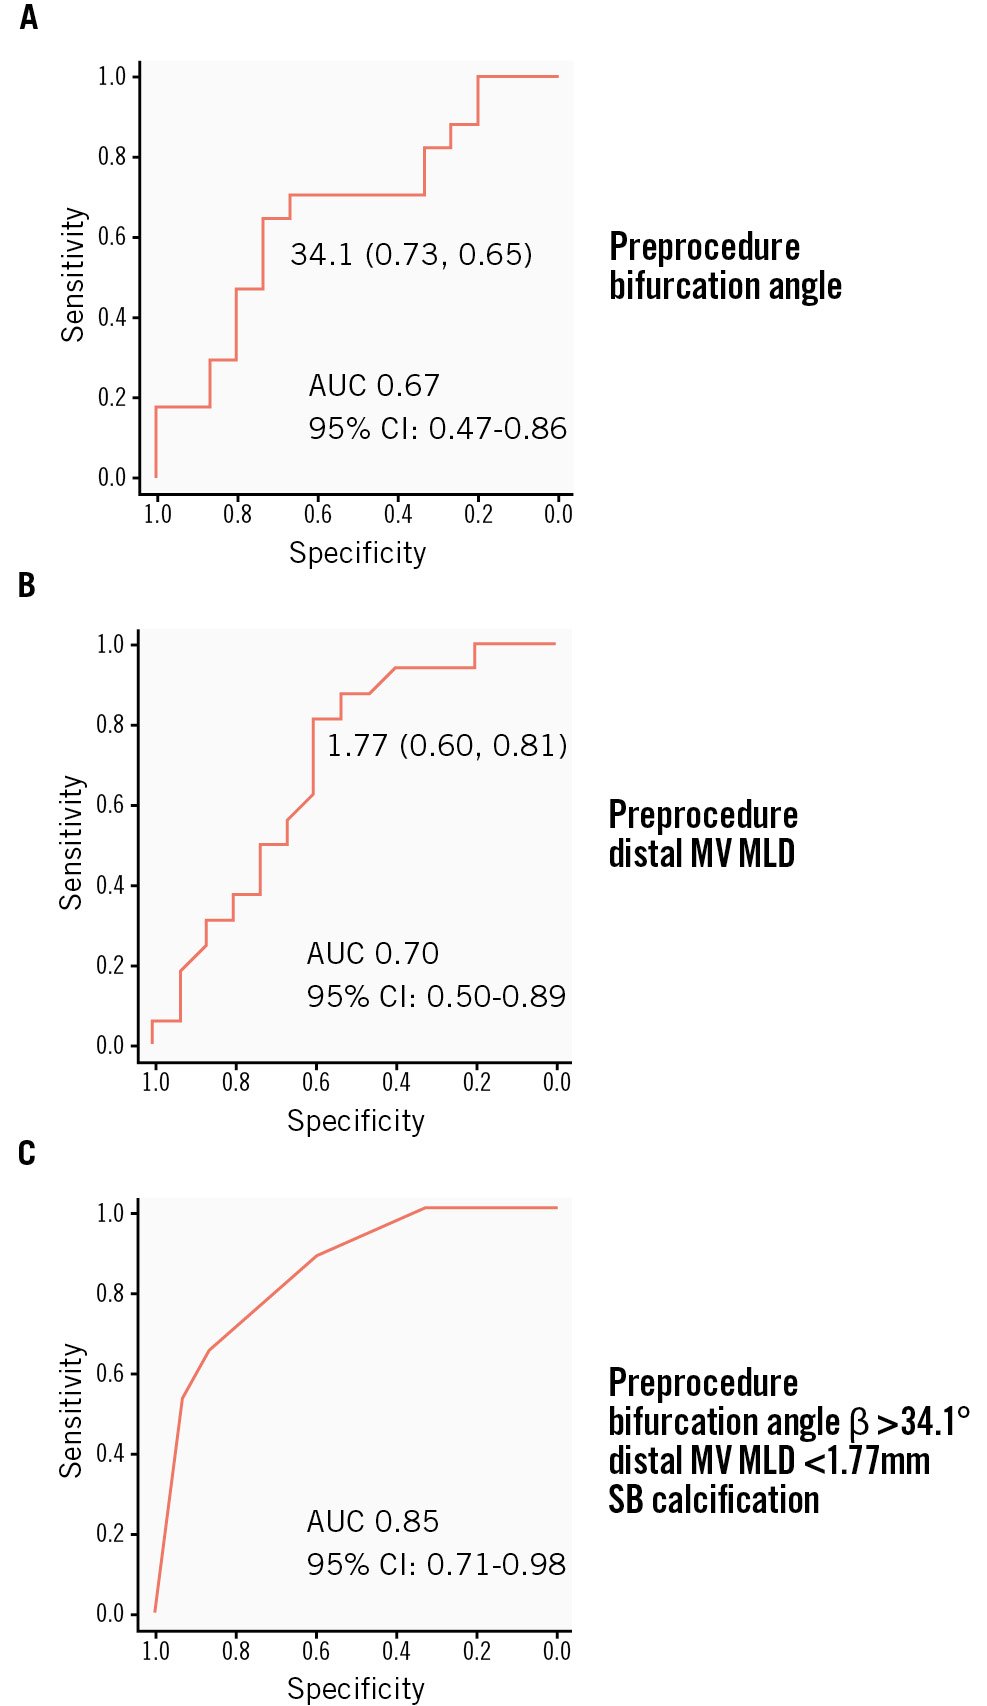
Figure 4. Discriminatory capacity of a model for RWT failure based on a receiver operating characteristic curve analysis. A) Preprocedural bifurcation angle β. The cutoff value is 34.1° with a sensitivity of 0.73 and specificity of 0.65, and the area under the curve (AUC) is 0.67 (95% confidence interval [CI]: 0.47-0.86). B) Preprocedural distal main vessel (MV) minimum lumen diameter (MLD). The cutoff value is 1.77 mm with a sensitivity of 0.60 and specificity of 0.81, and the AUC is 0.70 (95% CI: 0.50-0.89). C) Combination of preprocedural bifurcation angle β >34.1°, distal MV MLD <1.77 mm, and SB calcification. Discriminatory capacity is elevated with an AUC of 0.85 (95% CI: 0.71-0.98). RWT: reverse wire technique
Clinical outcomes during the follow-up period
The mean follow-up periods for the RWT-S and RWT-F/BBT groups were 991±807 days and 1,489±856 days, respectively. The incidences of coronary angiography were 53% and 47%, respectively. Target lesion revascularisation, target vessel revascularisation, and myocardial infarction occurred in 0%, 12%, and 0% in the RWT-S group and 7%, 13%, and 7% in the RWT-F/BBT group, respectively; these differences were not significant. No deaths occurred in either group.
Analysis of RWT success and failure
We analysed data from 25 patients undergoing a primary attempt at RWT. Similar trends were observed as in the original analysis, including smaller distal MV MLD, greater BA−β, and more SB calcification, SB bending, and distal MV bending in the RWT failure group (p<0.1) (Supplementary Table 1). ROC analysis identified the same cutoff values for distal MV MLD (1.77 mm) and BA−β (34.1°) (Supplementary Figure 1A, Supplementary Figure 1B). The combination of SB calcification, distal MV MLD <1.77 mm, and BA−β >34.1° demonstrated fair discrimination for predicting RWT failure (AUC 0.70) (Supplementary Figure 1C), although this performance was inferior to the original analysis (AUC 0.85) (Figure 4C).
Discussion
It has been reported that SB occlusion after MV stenting occurs in 7.4-8.4% of cases1213, leading to procedural myocardial infarction and elevated rates of adverse cardiac events at long-term follow-up. The RESOLVE score is a scoring system using angiographical features to predict SB occlusion; it weighs the risks of SB occlusion in plaque distributed on the same side of SB, worse preprocedural Thrombolysis in Myocardial Infarction flow grade in the MV, greater diameter stenosis of the bifurcation core, wider bifurcation angle, greater MV/SB diameter ratio, and greater SB diameter stenosis before MV stenting13. A risk analysis based on IVUS observation listed preprocedural SB diameter stenosis >50%, proximal MV diameter stenosis >50%, SB lesion length, and acute coronary syndrome as risk factors1. Analyses based on OCT revealed calcium plaque, bifurcation angle <70°, preprocedural SB diameter stenosis14, carina tip angle <50°, and length from branching point to carina tip <1.70 mm as predictive factors15. SB occlusion occurs via two mechanisms16: (1) carina shift due to MV stenting (where a narrow bifurcation angle, a smoky carina with a long tip and a rich or hard plaque burden in the MV are considerable risks)1718; and (2) plaque shift from the same side of the SB (where a wide bifurcation angle with a rich plaque burden close to the SB is associated with an elevated risk)13. Greater stenosis in the proximal MV, bifurcation core, and SB are common risks in both mechanisms.
RWT is useful for wiring to extremely bent SBs with a kick-back shape, which leads to the failure of usual antegrade wiring due to the lack of control in advancing the main part of the guidewire into the SB without its collapse in the distal MV2345. The kick-back shape bifurcation consists of a wider BA−α between the distal MV and proximal part of the SB and a narrower BA−β between the distal MV and the middle part of the SB. In the present study, RWT was successful in CBLs with a relatively wide BA−α (91.4±20.5°) and a narrow BA−β (36.4±18.6°) (Figure 3). CBLs with a kick-back shape have risks of both carina and plaque shifts, which elevate the risk of SB occlusion. Once SB occlusion has occurred after MV stenting, rewiring into the SB becomes difficult because of the peculiar anatomical features. Therefore, SB wiring before MV stenting is crucial to prevent SB occlusion. Additional plaque modification by balloon dilation in the SB ostium to change BA−α, or the jailed balloon technique, can effectively preserve SB patency19. In the RWT-F/BBT group, the pre-PCI BA−β was wide (51.6±29.8°) despite the wide BA−α (82.0±22.3°), and these angles did not change significantly post-PCI, as was seen in the RWT-S group (Figure 3). More frequent calcified lesions were detected on the SB ipsilateral side in the distal MV in the RWT-F/BBT group compared to the RWT-S group (Table 3). These findings indicate the presence of solid SB ostial lesions limiting advancement of an acutely bent wire and a change in the bifurcation angle after wiring or balloon dilation (Figure 5A).
Technical difficulties in the RWT are as follows: (1) setting the optimal tip angle and bending length of the guidewire for the individual kick-back shape of each CBL, (2) advancement of the hairpin-like bent portion to the distal MV without intimal injury, (3) directional control of the tip of the guidewire towards the SB, and (4) advancing the tail of the bent portion into the SB entirely. In the current RWT, a double-lumen catheter was used for safer advancement of the bent portion towards the distal MV, without intimal injury or tangling with the MV guidewire, with some improvement in directional control of the guidewire tip towards the SB and more backup support for advancing the bent portion into the SB entirely45. Although double-lumen catheters were used in all cases in which the RWT was attempted in the present study, the success rate was limited to 68% (17/25 cases). Optimal setting of the guidewire − with an acute bend at the tip, an appropriate curve in the proximal part and a bending length of 2-5 cm − is dependent on the individual anatomical features of CBLs and the expertise of the operator. In the RWT-F/BBT group, dissection or remaining stenosis after predilation, with a smaller MLD, was more frequent in the distal MV, which inhibited advancement of the double-lumen catheter and the bent portion of the guidewire. In the RWT-F/BBT group, the MV stent diameter was smaller, and tortuosity in the distal MV was greater, compared with the RWT-S group, suggesting that a smaller vessel lumen and severe tortuosity in the distal MV are also obstacles for advancing the bent portion of the guidewire (Figure 5B–Figure 5C–Figure 5D–Figure 5E). SB calcification and tortuosity were greater issues in the RWT-F/BBT group, indicating that these are obstacles to complete advancement of the bent portion of the guidewire into the SB. More SB calcification might be associated with rigidity of the bifurcated vessels, with unchanged bifurcation angles post-PCI (Figure 5A, Figure 5B, Figure 5E). In the predictive model for RWT failure, a combination of BA−β >34.1°, distal MV MLD <1.77 mm, and SB calcification before the procedure had reasonable accuracy (AUC 0.85) (Figure 4). These results were also confirmed in the analysis of cases with successful and failed primary RWT attempts (Supplementary Figure 1).
In the present study, BBT was successful in 5 of the 8 cases with RWT failure (success rate 62.5%) and in all 7 cases of primary BBT (100%) in which it would be difficult to deliver the bent portion to the distal MV using the RWT. In the BBT, optimal-sized balloon inflation at the bifurcated orifice in the distal MV, visualised on the imaging screen, is necessary to promote guidewire advancement to the SB78. A shorter balloon shoulder is advantageous for preventing the guidewire tip from entering the outer rim of the balloon. Once the guidewire tip has entered the SB ostium, usual manipulation of the guidewire can be applied, and support with a microcatheter is feasible in the ≥7 Fr guiding catheter system. Possible risks of this technique include injury to the distal MV by balloon dilation and temporary myocardial ischaemia in the broad MV-perfused area during the procedure, which limits procedural time to 30-120 seconds. However, the BBT has an advantage in cases where it is difficult to advance the bent guidewire to the distal MV or where it is expected to be difficult to manage the guidewire inside the SB with the RWT. There was no significant difference between the RWT and BBT with respect to clinical events during the follow-up period. In cases with a high risk of RWT failure, primary BBT is feasible, and BBT can be an alternative technique in cases of RWT failure.
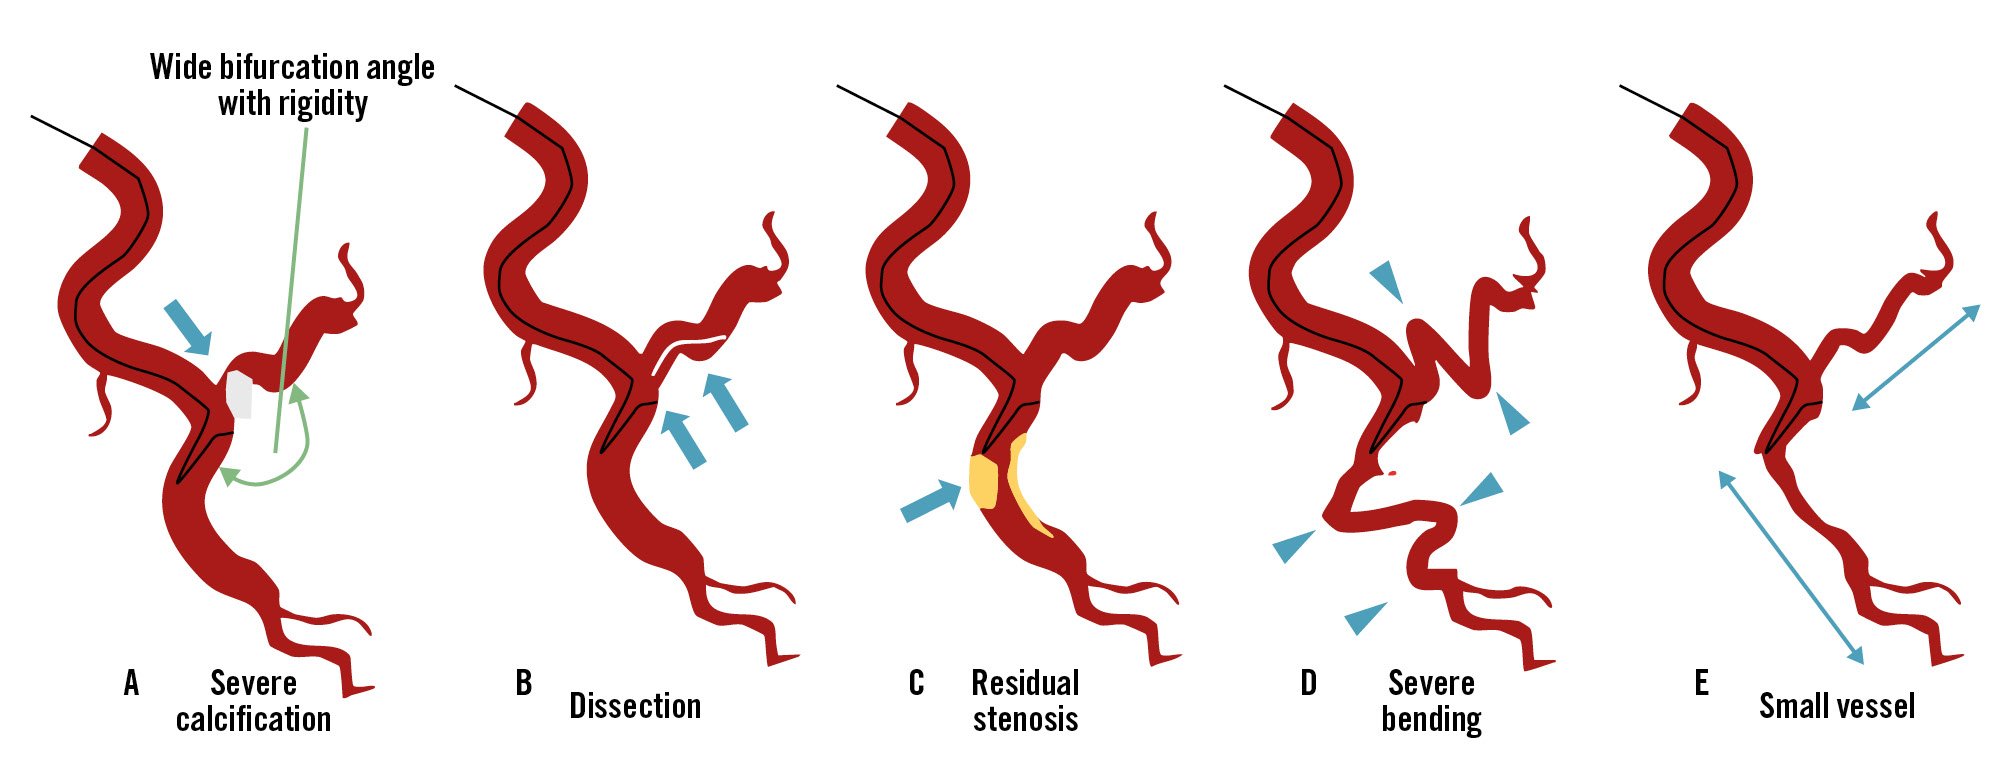
Figure 5. Schematic of the risks of reverse wire technique failure. A) Severe calcification in the side branch (SB) ostium with a wide bifurcation angle which has a rigid vessel component; B) SB dissection; C) residual stenosis in the distal main vessel (MV); D) severe bending in the SB and distal MV; E) small vessel portion of the distal MV and SB.
Limitations
This study has several limitations. 1) This was a retrospective, single-centre, observational study that included only a small number of cases. Large-scale, multicentre studies are needed to confirm the efficacy and feasibility of the RWT and BBT. 2) A combined control group of RWT failure and primary BBT was used because 7 cases were deemed unsuitable for RWT and required primary BBT. While the combined control group showed similar trends to those observed in RWT failure cases (Supplementary Table 1, Supplementary Figure 1), it may not accurately reflect the predictors of pure RWT failure. 3) Quantitative assessment of coronary angiography before the procedure may have been inaccurate due to intimal dissection with hazy imaging induced by predilation in the MV. 4) In this series of complex coronary bifurcation PCI involving challenging SB wiring and imaging device delivery, pre-PCI imaging was obtained in 12 cases for the MV but none for the SB, which proved insufficient for predicting RWT failure. 5) Since angiographical SB patency was not confirmed in all cases during the follow-up period, asymptomatic SB-related events were likely undercounted.
Conclusions
The findings identify key predictors of RWT failure in complex CBLs, including large bifurcation angles, small distal MV lumen diameters, calcification, and vessel tortuosity. In such cases, the BBT presents a viable alternative when RWT failure is highly suspected.
Impact on daily practice
The findings highlight key predictors of failure in the reverse wire technique (RWT) for complex coronary bifurcation lesions (CBLs), including large bifurcation angles, small main vessel lumen diameters, calcification, and vessel tortuosity. Understanding these risk factors can help operators anticipate potential challenges and select appropriate strategies early in the procedure. The balloon blocking technique is an effective alternative when the RWT is likely to fail, achieving high success rates in difficult side branch wiring. Incorporating this knowledge into daily practice should allow interventional cardiologists to make informed decisions, potentially improving procedural outcomes and reducing complications in patients with complex CBLs. Tailoring the approach based on lesion characteristics can optimise success rates in challenging cases.
Conflict of interest statement
Y. Murasato received a research grant from OrbusNeich; and lecturer fees from Abbott, Medtronic, Boston Scientific, Terumo, and Kaneka. The other authors have no conflicts of interest to declare.